Dispatch
Flaky French Butter Croissants Recipe
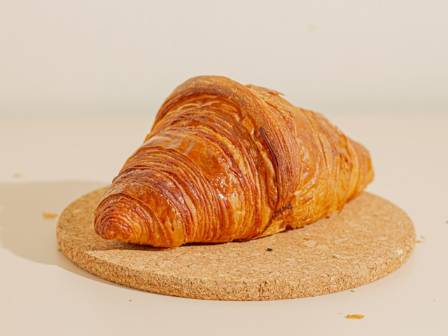
Few baking experiences are as satisfying as pulling a tray of freshly baked French butter croissants from the oven. Their crisp golden exterior, delicate layers, and rich buttery flavor make them one of the most beloved pastries in the world. Although croissants require patience and careful technique, the reward is a bakery-quality pastry made entirely from scratch.
Theo Whitman
Rider
Desk note
Full dispatch and transfer tips sit below.
Line
Blue Line Walk
Few baking experiences are as satisfying as pulling a tray of freshly baked French butter croissants from the oven. Their crisp golden exterior, delicate layers, and rich buttery flavor make them one of the most beloved pastries in the world. Although croissants require patience and careful technique, the reward is a bakery-quality pastry made entirely from scratch.
Why French Croissants Are Unique
Traditional French croissants are famous for their laminated dough, a process that creates countless thin layers of dough and butter. During baking, moisture in the butter turns to steam, separating the layers and producing the signature flaky texture.
Unlike simpler pastries, authentic croissants rely on multiple stages of folding, rolling, chilling, and proofing. Proper temperature control and fermentation are essential to achieving a crisp exterior and a light, honeycomb-like crumb inside.
Step-by-Step Croissant Method
Making the Base Dough (Détrempe)
Begin by stirring honey into lukewarm milk. Add the yeast and allow it to sit for 10 to 20 minutes until foamy and active.
Add water, melted butter, sugar, flour, and salt. Mix everything together with a spatula until a rough dough forms.
Knead the dough in the bowl for 1 to 2 minutes, then transfer it to a work surface and continue kneading for about 4 minutes until smooth and elastic.
Place the dough in a bowl, cover with plastic wrap, and let it rise in a warm area until doubled in size, approximately 1 hour.
After fermentation, gently press out excess air. Shape the dough into a rectangle on parchment paper and fold the parchment around it to create a 7 x 10-inch template. Roll the dough to fit the shape, wrap securely, and freeze for several hours or overnight.
Preparing the Butter Block
Cut 140g of cold butter into thin slices.
Arrange the slices inside a 5 x 6.5-inch rectangle marked on parchment paper. Fold the paper around the butter to enclose it.
Use a rolling pin to pound the butter until pliable, then roll it evenly within the parchment until it fills the rectangle completely.
Place the butter block in the refrigerator until firm.
The Lamination Process
Lamination is the most important stage of croissant making because it creates the pastry’s signature flaky structure.
If the dough has been frozen solid, allow it to soften slightly for about 30 minutes before beginning. The butter and dough should have a similar consistency.
Place the dough on your work surface and position the butter block on one half. Press gently to help the butter adhere to the dough, then remove the parchment.
Fold the dough over the butter and seal all edges firmly, ensuring the butter is fully enclosed.
First Fold (Double Fold)
Lightly flour the work surface.
Roll the dough into a rectangle approximately 16 inches long while maintaining a width of around 5 inches.
Fold a small section from one end toward the center, then fold the opposite end to meet it.
Trim or cut the corners slightly to reduce tension. Brush away excess flour and fold the dough in half.
Wrap and chill for at least 30 minutes, preferably 1 hour.
Second Fold (Single Fold)
Roll the chilled dough into a rectangle about 15 inches long.
Fold it into thirds, similar to folding a business letter.
Trim the corners again, wrap, and refrigerate for another 30 to 60 minutes.

Rolling and Cutting
Place the dough on a lightly floured surface with the folded side facing you.
Press gently with a rolling pin and roll the dough to approximately 1 cm thick.
Transfer it to the refrigerator for 30 to 45 minutes so the gluten can relax.
Roll again until the dough reaches about 4 to 5 mm thickness and measures roughly 9.5 to 10 inches wide.
Trim the edges neatly to create a 9-inch-wide rectangle.
Mark intervals of about 3.5 inches along one side, then stagger the markings on the opposite side.
Connect the marks diagonally to form triangles. You should obtain approximately six evenly shaped croissant pieces.
Shaping and Final Proof
Cut a small 1 cm slit in the center of each triangle’s base.
Starting from the wide end, roll each triangle toward the tip while gently stretching the base corners outward.
Arrange the croissants on a lined baking sheet, making sure the tip rests underneath.
Cover loosely with plastic wrap and place another tray on top to protect them while proofing.
Allow them to rise at approximately 77°F (25°C) until doubled in size and noticeably puffy. Depending on room conditions, this usually takes 2 to 3 hours.
Properly proofed croissants should wobble slightly when the baking sheet is gently shaken.
Baking
Preheat the oven to 375°F (190°C) at least 30 minutes before baking.
Whisk together egg yolk and milk to create an egg wash.
Brush the croissants carefully with a soft pastry brush.
Bake for 20 to 30 minutes, or until deeply golden and evenly browned. Rotate the tray halfway through baking if necessary.
Allow the croissants to cool briefly on a wire rack before serving.
Essential Equipment
Rolling pin for laminating and shaping
Mixing bowls for dough preparation
Baking sheets for proofing and baking
Sharp chef's knife for trimming and cutting
Cutting board for safe preparation
Pastry brush and spatula
Measuring cups and spoons for accuracy
Reliable oven with stable temperature control
Professional Tips for Success
Maintaining proper temperature is critical. If either the dough or butter becomes too warm, return it to the refrigerator before continuing.
Work efficiently while keeping the dough cool throughout the lamination process.
Avoid rushing the final proof. Under-proofed croissants tend to be heavy and dense, while fully proofed croissants bake up light and airy.
Whenever possible, use high-fat European-style butter containing 82–84% butterfat. It creates superior flavor and more distinct layers.
Frequently Asked Questions
How long does the process take?
Croissants typically require two to three days from start to finish, including chilling and proofing periods. Active preparation time is usually around two to three hours.
Can the dough be frozen?
Yes. Laminated dough can be frozen after the second fold, and shaped croissants can also be frozen before their final rise.
Why didn't my croissants become flaky?
The most common causes are butter that became too soft, dough that warmed up excessively, or insufficient folding during lamination.
Can I use a stand mixer?
Yes, though hand kneading allows better control and helps prevent overworking the dough.
How should baked croissants be stored?
They are best eaten the day they are baked. Store leftovers in an airtight container at room temperature and refresh them in a 350°F oven for a few minutes before serving.
Can I make chocolate croissants?
Certainly. Place a piece of dark chocolate near the base of each triangle before rolling and proceed with proofing and baking as usual.
Final Thoughts
Making authentic French butter croissants at home is both a challenge and a rewarding achievement. The process combines precision, patience, and craftsmanship to create one of the world's most iconic pastries.
Once you experience the crisp exterior, airy layers, and rich buttery flavor of a homemade croissant fresh from the oven, you'll understand why every step is worth the effort. Whether you're baking for a special breakfast, brunch, or simply to master a classic French technique, these croissants are sure to impress.

Nearby stops
 STOP
· en
Deep Sea Wonders: Crafting Marine Life Clay Figurines
Gregory Michael Dawson
 STOP
· en
Embrace the Treetop Magic: 5 Remarkable Tree Houses in Bali for an Extraordinary 2023 Getaway
Ella Skye
 STOP
· en
Most crooked houses in Amsterdam
Theodore Langford
 STOP
· en
What Are the Best Beaches Near Seattle?
Gabriella Montrose
 STOP
· en
7 relaxing colors and how they affect your mood!
Sofia Adams
 STOP
· en
Reasons Why Apples Are Good for You
Cecilia Moore